HTML Activity
Welcome to the HTML Activity page!
Here you will learn step-by-step how to create your own webpage.
1 Getting Started
- Let's get started! Websites that you see while browsing the internet, are nothing more than simple textfiles. So to write your own website, you don't need anything more than just a simple text editor. During these lessons, we are going to use Firefox Thimble, because it provides a nice way to display your website as you make changes to it, however everything can as well be done in a simple text editor offline.
- Now, let's have a look at the code of a simple webpage! Log in to Firefox Thimble and open the provided sample website. You should see something like this:
-

2 HTML
- Alright, let's find out what all that text means.
Structure of HTML pages is defined by tags that surround their content and carry some specific functionality. Below, in the provided code, you can see quite a few tags:
<!DOCTYPE html> <html> <head> <meta charset="utf-8"> <meta name="viewport" content="width=device-width, initial-scale=1"> <title>Made with Thimble</title> <link rel="stylesheet" href="style.css"> </head> <body> <h1>Welcome to Thimble</h1> <p> Make something <strong>amazing</strong> with the web! </p> </body> </html>It is important to notice, that some tags consist of two parts: an<opening tag>and a</closing tag>. The difference is that the latter has the/(slash) character. Also notice, how the content, is "wrapped" inside of those tags.
- The line
<!DOCTYPE html>tells a browser which version of HTML the webpage is written in but in HTML5 (that we are using), you just write<!DOCTYPE html>without specifying any particular version. - The
<html>tag tells the browser that it is an HTML document. It also serves as a container for all other HTML elements. - And just like us, all HTML documents have a
<head>and a<body>. Inside a<head>tag, we can specify ...<meta>defines parameters of your webpage. For now, don't worry about it, these are just some "standard" parameters that every webpage needs to have. If you're curious what they do, it is explained in "More Information" section below.<link>tag defines a link between your HTML document and any other external resource. Here, we use<link>to reference our style sheet. We'll cover what a stylesheet is later.
- Inside the
<title>tag, you can set your webpage's title. Easy! - All the other content, such as captions, text, images, etc., will go inside the
<body>tags. In the code above, there are<h1>,<strong>and<p>tags.<h1>is a tag that is used for headers.- As you could guess, the
<strong>tag allows you to emphasize the text by making it bold. - Finally,
<p>stands for paragraph and just wraps paragraphs of plain text.
- The line
- Have fun making your webpage! Try modifying and customizing headers, title, and text in your webpage.
-
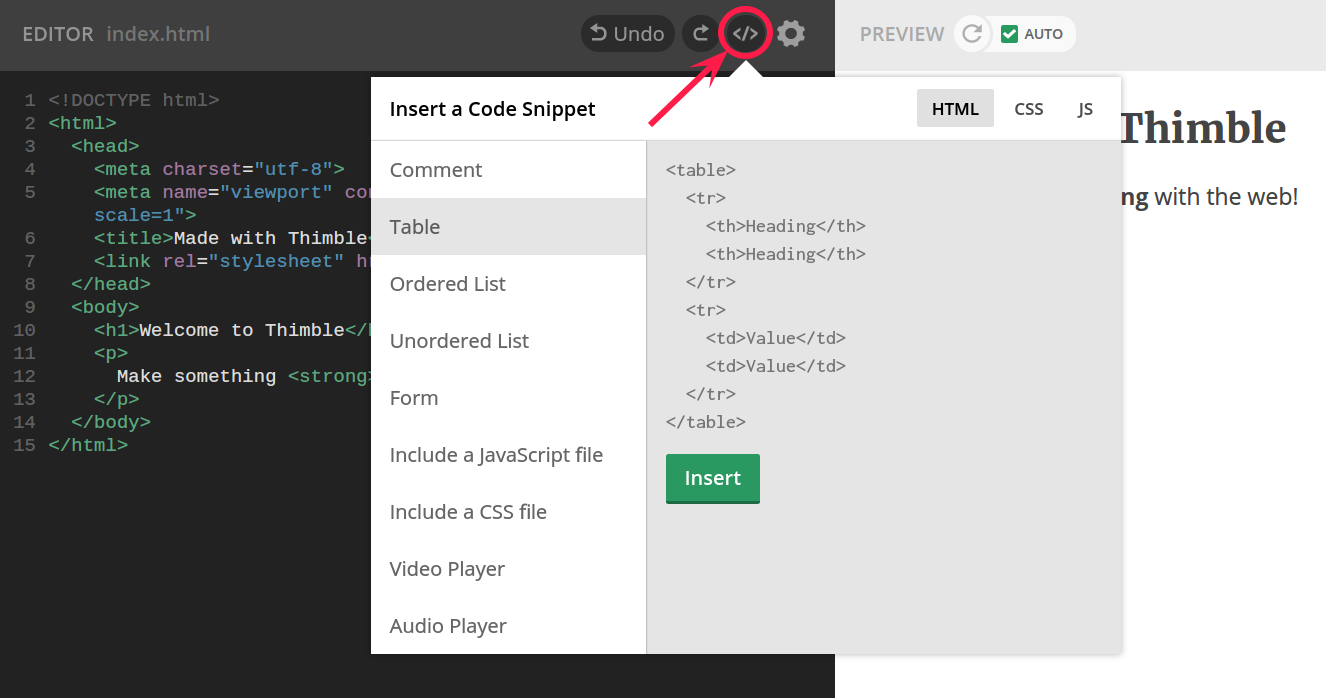
Firefox Thimble also provides functionality of inserting little code snippets. You can try some of those too! See the screenshot below:
3 HTML TO-DO List
-
1. Change the size of your headings
- Headings are what we call the title of your section. Your section headings are between two container markup tags which may look like
<h1>and</h1>. - There are six types of headings:
<h1>,<h2>,<h3>,<h4>,<h5>, and<h6>.<h1>is the largest and<h6>is the smallest. - Tip: Don't use headings to make words big and bold. Web browsers use the heading tags to figure out what sections are in your website. See the rest of this section for how to make words big and bold without using the heading tags!
2. Change the font size
- Add a font tag to the body of your HTML like so: <font size="7">My re-sized text here</font> and replace 7 with a number from 1 to 7 (where 1 is the smallest, and 7 is the biggest), and My re-sized text here with the text you want to be big or small!
- Tip: Remember that you can nest tags inside one another, so you can do things like use both <font> and <b> tags to make text both a different size and bold
3. Change the font colour
- Choose a colour and copy its hex code by going to an online colour picking tool, finding a colour you like, and copying the six-digit code that represents it, which looks like #aaaaaa, except that the a's can be letters (from a-f) or numbers
- Add a font tag to the body of your HTML like so: <font color="#aaaaaa">My colourful text here</font> making sure to replace aaaaaa with the hex code you copied in the first step, and My colourful text here with the text you want to be colourful!
- Tip: You can add multiple attributes (like size and color) to the same <font> tag! For example: <font size="7" color="#ff0000">My big red text here</font>
4. Change the background
You can choose to make your background a certain colour or make the background of your webpage a certain picture.
If you want to make your background a certain colour:
- Choose a colour and copy its hex code by going to an online colour picking tool, finding a colour you like, and copying the six-digit code that represents it, which looks like #aaaaaa, except that the a's can be letters (from a-f) or numbers.
- Add the following to the body tag <style="background-color:#aaaaaa making sure to replace aaaaaa with the hex code you copied in the first step. Don't forget the # in front of your colour code!
If you want to make your background a certain image:
- Choose a picture and copy its URL (or you can save a picture to desktop).
- Add the following to the body tag <style="background-image:url('aaaaaa') making sure to replace aaaaaa with the URL you copied in the first step.
5. Add a link
- Copy a website URL by opening the webpage in a new tab, then selecting the URL in the browser's bar and pressing CTRL-C to copy it
- Add an anchor tag to the body of your HTML like so: <a href="http://www.example.com/page.html">My Link Text</a> making sure to replace http://www.example.com/page.html with the URL you copied in the first step, and My Link Text with what you want the link to say.
- To link to another webpage that you have made, simply replace the URL with the location and name of the webpage you want to link to. For example, if I am working on a webpage that has been saved to Desktop and I want to make a link to another webpage called Jessica.html that is also saved on Desktop, I would use <a href="Jessica.html">My Link Text</a>. If Jessica.html is stored in a folder on Desktop called "OtherWebpages", I would have to use <a href="OtherWebpages/Jessica.html">My Link Text</a> to link to Jessica.html.
6. Add an image
- Copy an image URL by looking up an image (try Google Images), then right-clicking on the image and choosing "Copy Image URL" from the menu
- Add an image tag to the body of your HTML like so: <img src="http://www.example.com/image.jpg"> making sure to replace http://www.example.com/image.jpg with the URL you copied in the first step.
7. Add a YouTube video
- Go to YouTube and choose a video
- Copy the embed code by right-clicking on the video and choosing "Copy Embed Code"
- Paste the embed code into the body of your HTML file
8. Make a list
- There are two types of lists: ordered and unordered. Ordered lists are lists that have numbers before each item (like the list you are looking at now!) while unordered lists have bullet points before each item.
- To make an ordered list, use
<ol>and</ol>to encapsulate each item of your list. To denote each individual item, surround it with<li>and</li>. - To make an unordered list, use
<ul>and</ul>to encapsulate each item of your list. To denote each individual item, surround it with<li>and</li>.


- Headings are what we call the title of your section. Your section headings are between two container markup tags which may look like
4 CSS
-
Introduction
What is CSS? It stands for Cascading Style Sheets. CSS gives us control over how HTML elements are displayed. Practically all styling of websites are made with CSS. Below is the example of how the exact same HTML can look with different stylesheets.To use CSS, we need to include the link to our CSS file inside the HTML document. This is exactly what this line did for us:
Source: w3schools
<link rel="stylesheet" href="style.css"> -
How to change a tag's style
To define a style for an HTML tag, you need to have the following pieces of information:
tag_name {
property-name: value;
property-name2: value2;
}
tag_name refers to the tag you want to style. For example, if you want to make all<h1>section headings purple and italized, the tag_name would be h1.
property-name refers to the property you want to change about the tag. For example, if you want the section heading to be blue, you would use color as the property-name and blue as the value. - The code to make our h1 section headings purple and italized would look like:
h1 {
color: #bb22ee;
font-style: italic;
} -
How to change style of a group of items
But sometimes, we only want a selected group of tags have a "special" property. For example, we want some images to appear large and other images to appear small on our page. What do we do then, if all images use the same<img>tag?
In such cases, CSS provides a possibility to access elements by their class, and multiple elements can belong to the same class. So, going back to our example, we can do something like:
.small_image {
width: 100px;
height: auto;
}
.medium_image {
width: 300px;
height: auto;
}
Pro Tip! Notice that when we use classes (as opposed to tag names) we put a period before the name to indicate that it is not actually a tag name but a class name.
Then, in HTML we will set classes to items as follows:
<img class="small-image" src="example.jpg"/>
<img class="medium-image" src="example.jpg"/>

-
How to change style of one item
There is an even more granular way of changing an element's style: through ids. Ids are unique: each element's id should be different. So, you can assign an HTML tag an id, and access that tag's style by its id. There is not much difference if you use classes or ids to change styles. But the difference becomes apparent when we learn javascript (next class!).
So, for instance, we could do something like this:
#my-red-text {
color: red;
background-color: yellow;
}
Pro Tip! Notice that when we use ids (as opposed to tag names and classes) we put a hashtag sign before the name to indicate that it is not actually a tag name but an id.
Then, in HTML we will set ids as follows:
<h1 id="my-red-text"> Hello World! </h1>
And it will look like:Hello World!
- To see all the things you can control with CSS, visit the w3schools page.
Pro Tip! Note the spelling of color. In CSS, we use the Americanized version of spelling.
My Purple Italized Heading
Pro Tip! Don't forget the semicolon after each property-name:value line. Semicolons are used to diffrentiate between properties that you want to change.
5 CSS TO-DO List
-
CSS Exercises
CSS provides us with flexibility to change the style of an entire webpage by only editing the CSS file. Implement the tasks below by changing
style.cssfile and adding classes/ids to the HTML elements. No inline styling is allowed!1. Change the font size of any heading tag
- Tip: You may choose to change any heading tag and set the font size to any (reasonable) number. The property name you might want to play with is
font-size. For all the possible ways that you can change font sizes, refer to w3schools CSS fonts page.
2. Make the weblinks colour different
- The default link color is blue. Make the weblinks colour different from the default.
- Tip: To do this, please refer to the CSS examples above.
- Color Picker may be useful to you for choosing colors of various hues and shades.
3. Change the background of your website
- Tip: You can either choose a different background colour or a background image. Those two properties correspond to
background-colorandbackground-image. More information is available at w3schools CSS backgrounds page.
4. Insert images of different sizes.
- Specify three classes of images:
small_image,medium_imageandlarge_image, that have widths of maximum 100px, 300px and 500px respectively. - Have at least one image of each size.
- Tip: You can look at the image examples above to see how to define and use CSS classes.
5. Change the style of any element with CSS id.
- Which HTML element you pick to change, is up to you. The only "rule" is to use CSS ids for doing that.
- Tip: Look at the code above to see some examples.
6. Change the font of your webpage.
- You already reached this exercise? It means that you are up to some challenge!
- Google provides an easy way to incorporate all sorts of fonts into websites through Google Fonts. Can you figure out how to use them?
7. Make your perfect website!
- Alright! Now you have all necessary tools to stylize your website.
- Experiment with styles and make your website look amazing!
- Tip: You may choose to change any heading tag and set the font size to any (reasonable) number. The property name you might want to play with is
More information
-
What do
<meta>and<title>tags do?- As was said earlier,
<meta>sets the webpage's parametres. In the code example above,charsetspecifies the character set used in the HTML document. Viewport is the area of a web page that is visible to a user, so"viewport"tells the browser how to control the page's dimensions and scaling. - In a browser, the title is what will be shown on the webpage's tab. If you host your webpage on the internet, and search for it in Google or other search engine, the title is also what they will show to you in search results.
- As was said earlier,